DISCLAIMER: Manually flashing or updating the OS may brick your device, rendering it unusable. By proceeding, you accept full responsibility for any risks involved, including potential data loss or hardware malfunction.
There are 2 ways to manually install and update your OS on the BraX3:
- Via fastboot - doesn’t allow to preserve user data on the device.
- Via spflash tool - allows preserving user data when installing.
Prerequisites
Regardless of which way you choose, you need to ensure the following:
- Your BraX3 is charged to at least 35%
- (Windows only) You have installed the latest MediaTek USB driver (Windows driver)
- You have a USB cable that can establish a reliable connection to the device
- You downloaded the latest OS package installer, depending on the OS you want to install
Install via spflash
Installing via spflash holds some advantages over installing via fastboot, mainly the possibility to not erase userdata, possible since the bootloader can be locked when using spflash.
Before you start, you need to ensure the following:
- You’ve installed the spflash tool (by MediaTek). Link here.
How to install the OS on Windows
- Open the
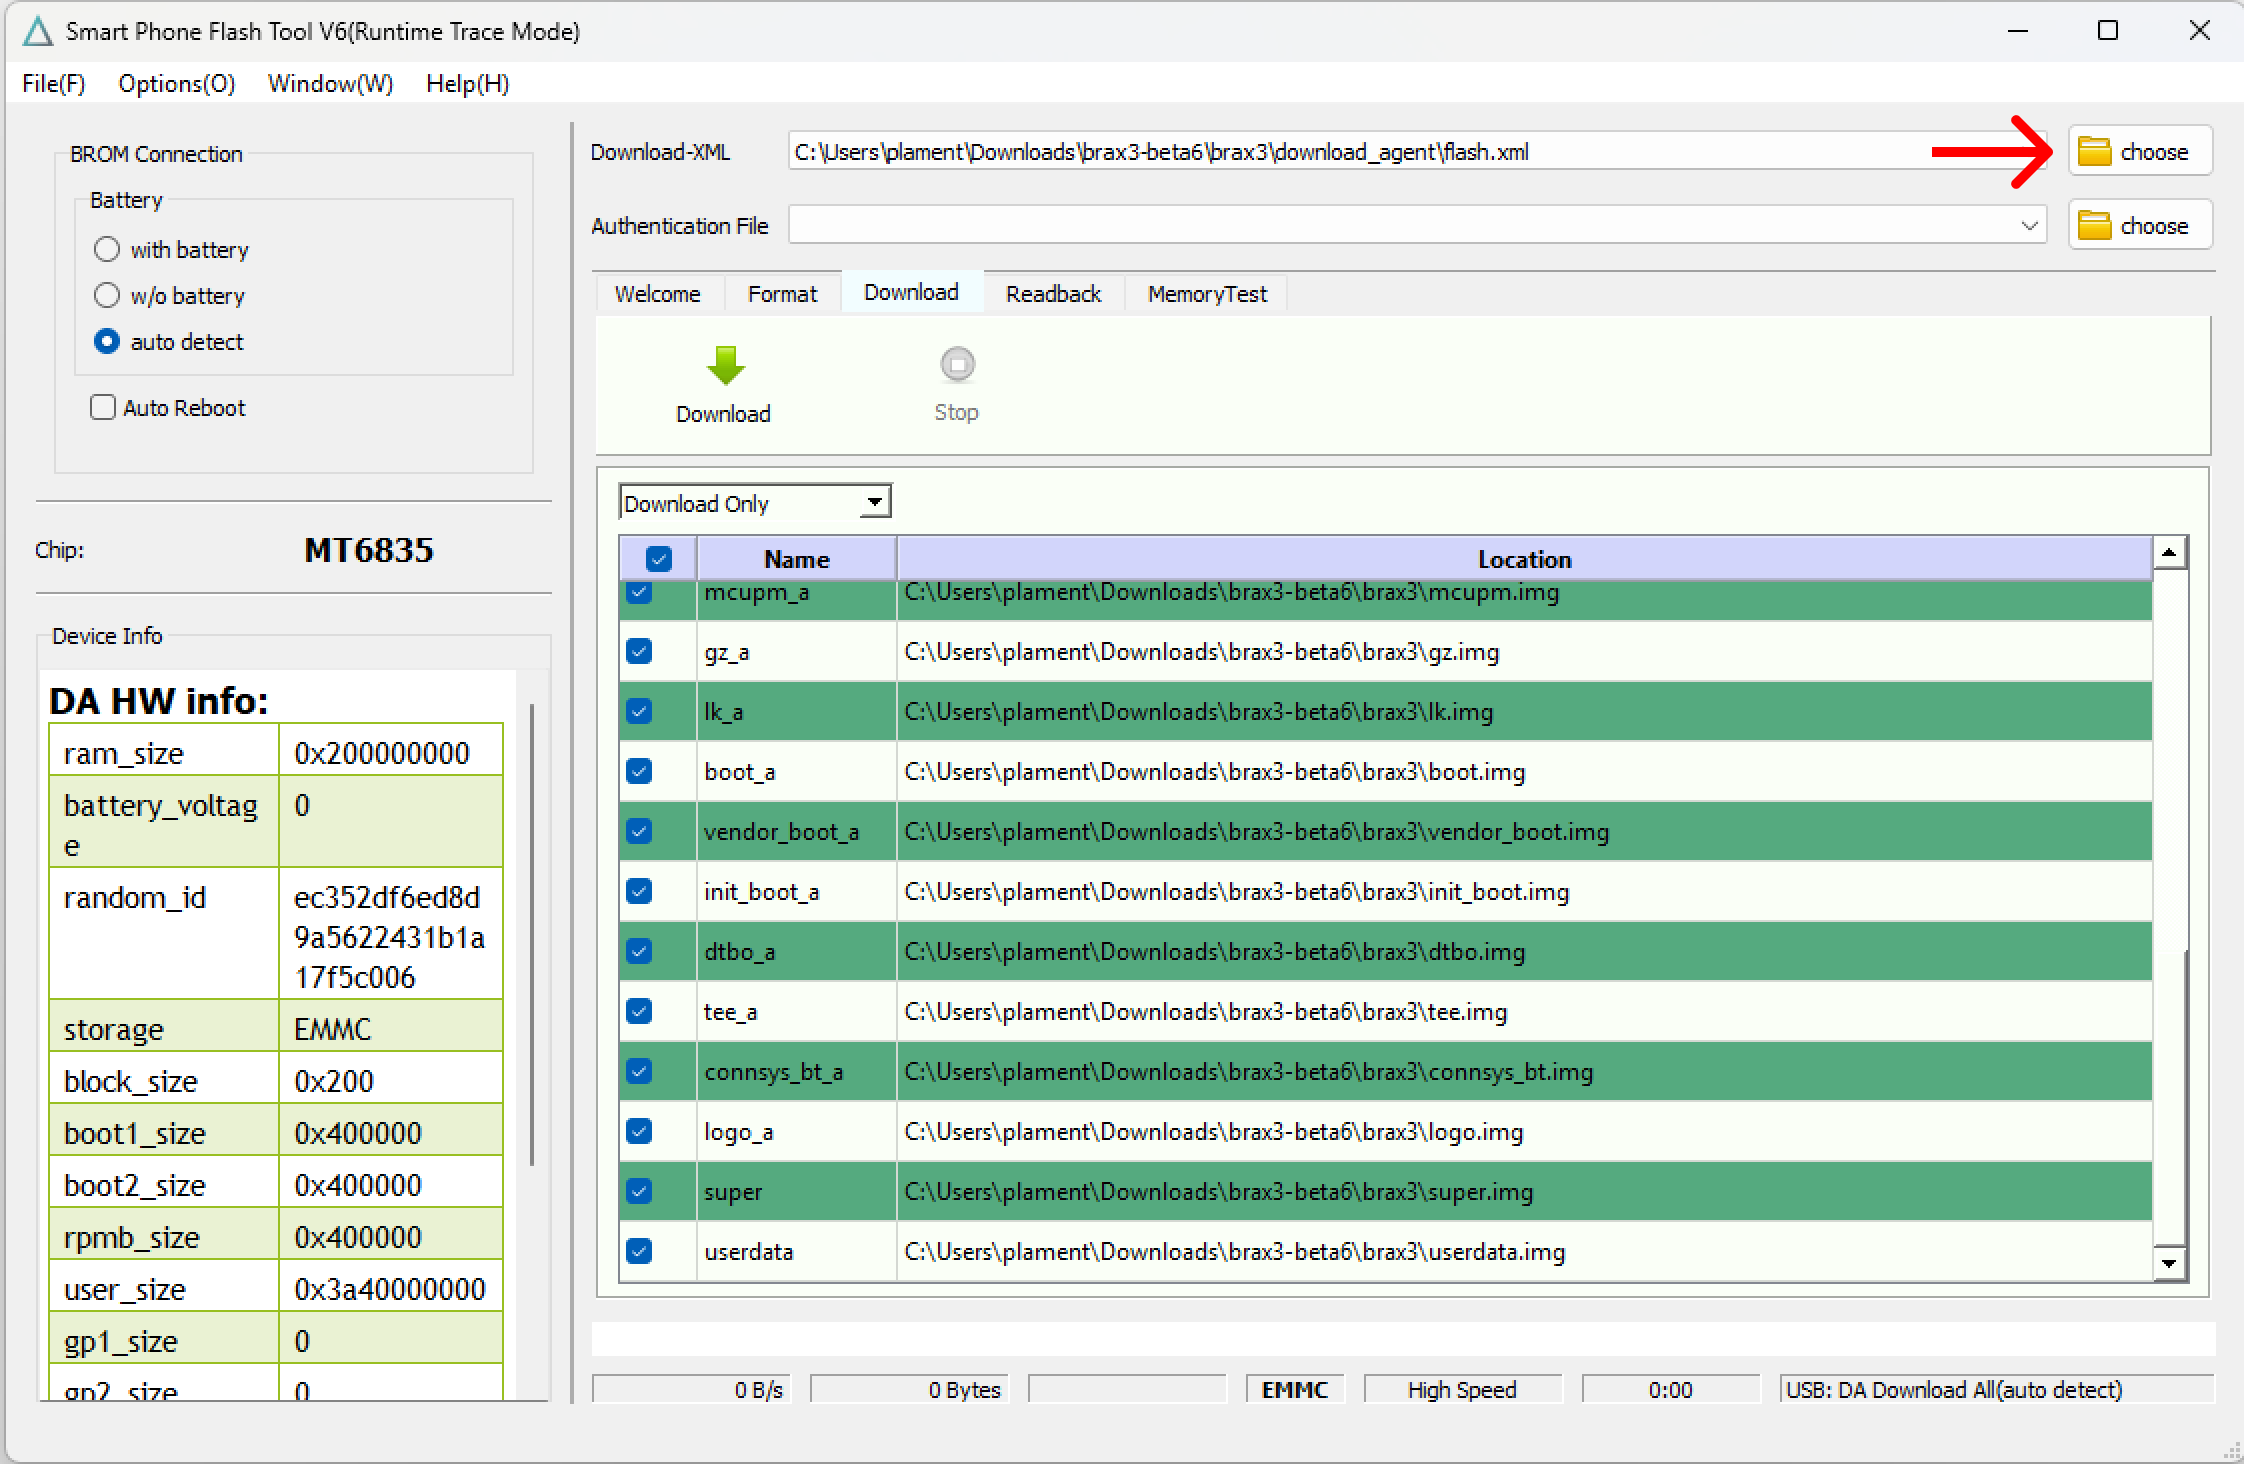
SPFlashToolV6application located in the folder where your spflash is downloaded - Add the Download-XML file, by pressing on the
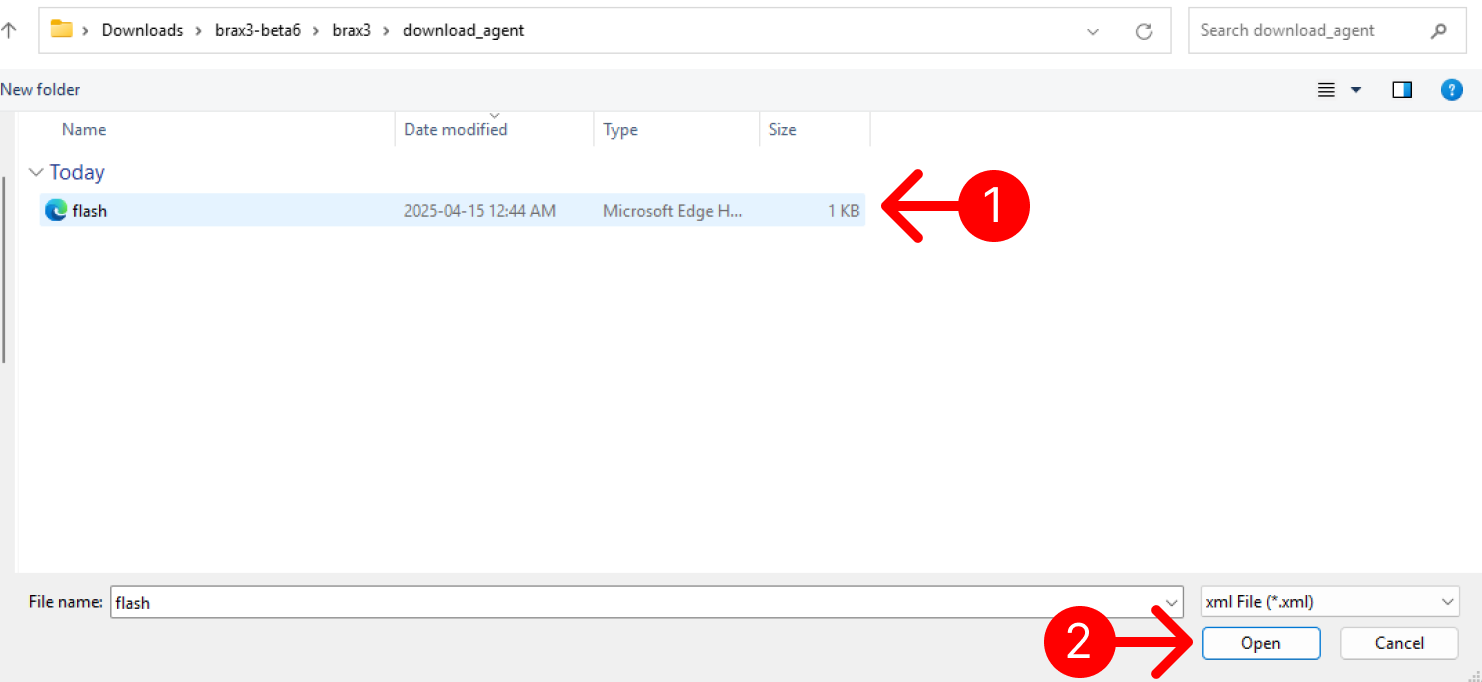
choosebutton (next to Download-XML), and selecting theflash.xmltypically located in thedownload_agentfolder in the OS installation package you’ve downloaded.
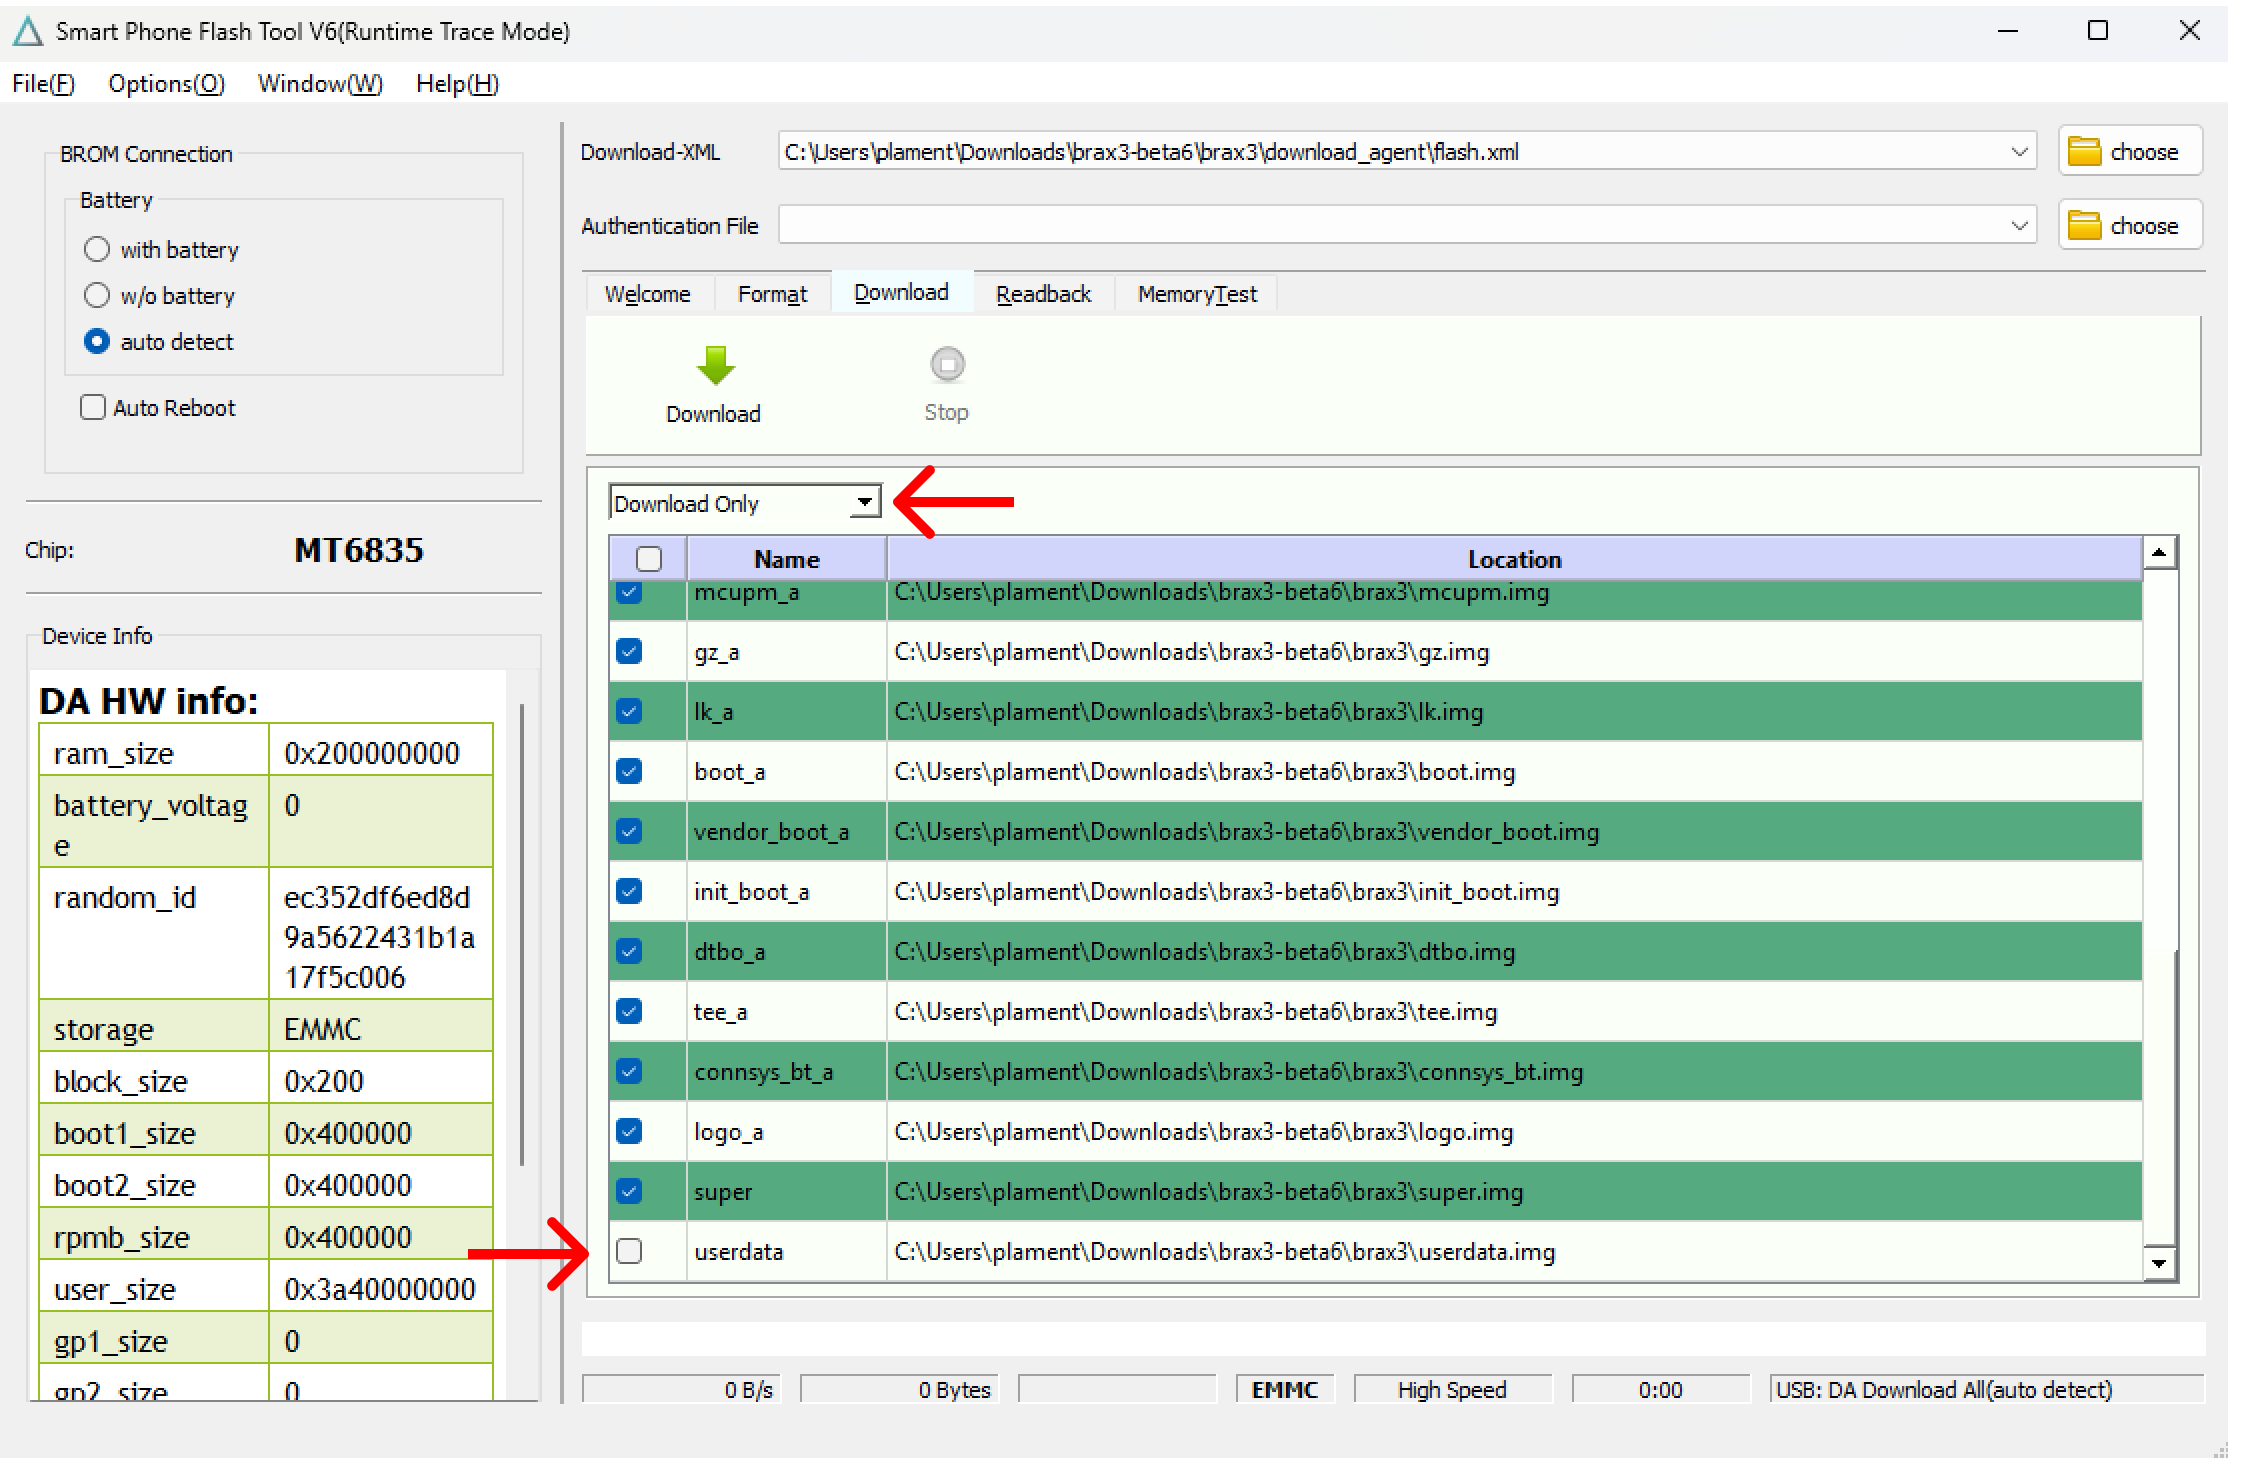
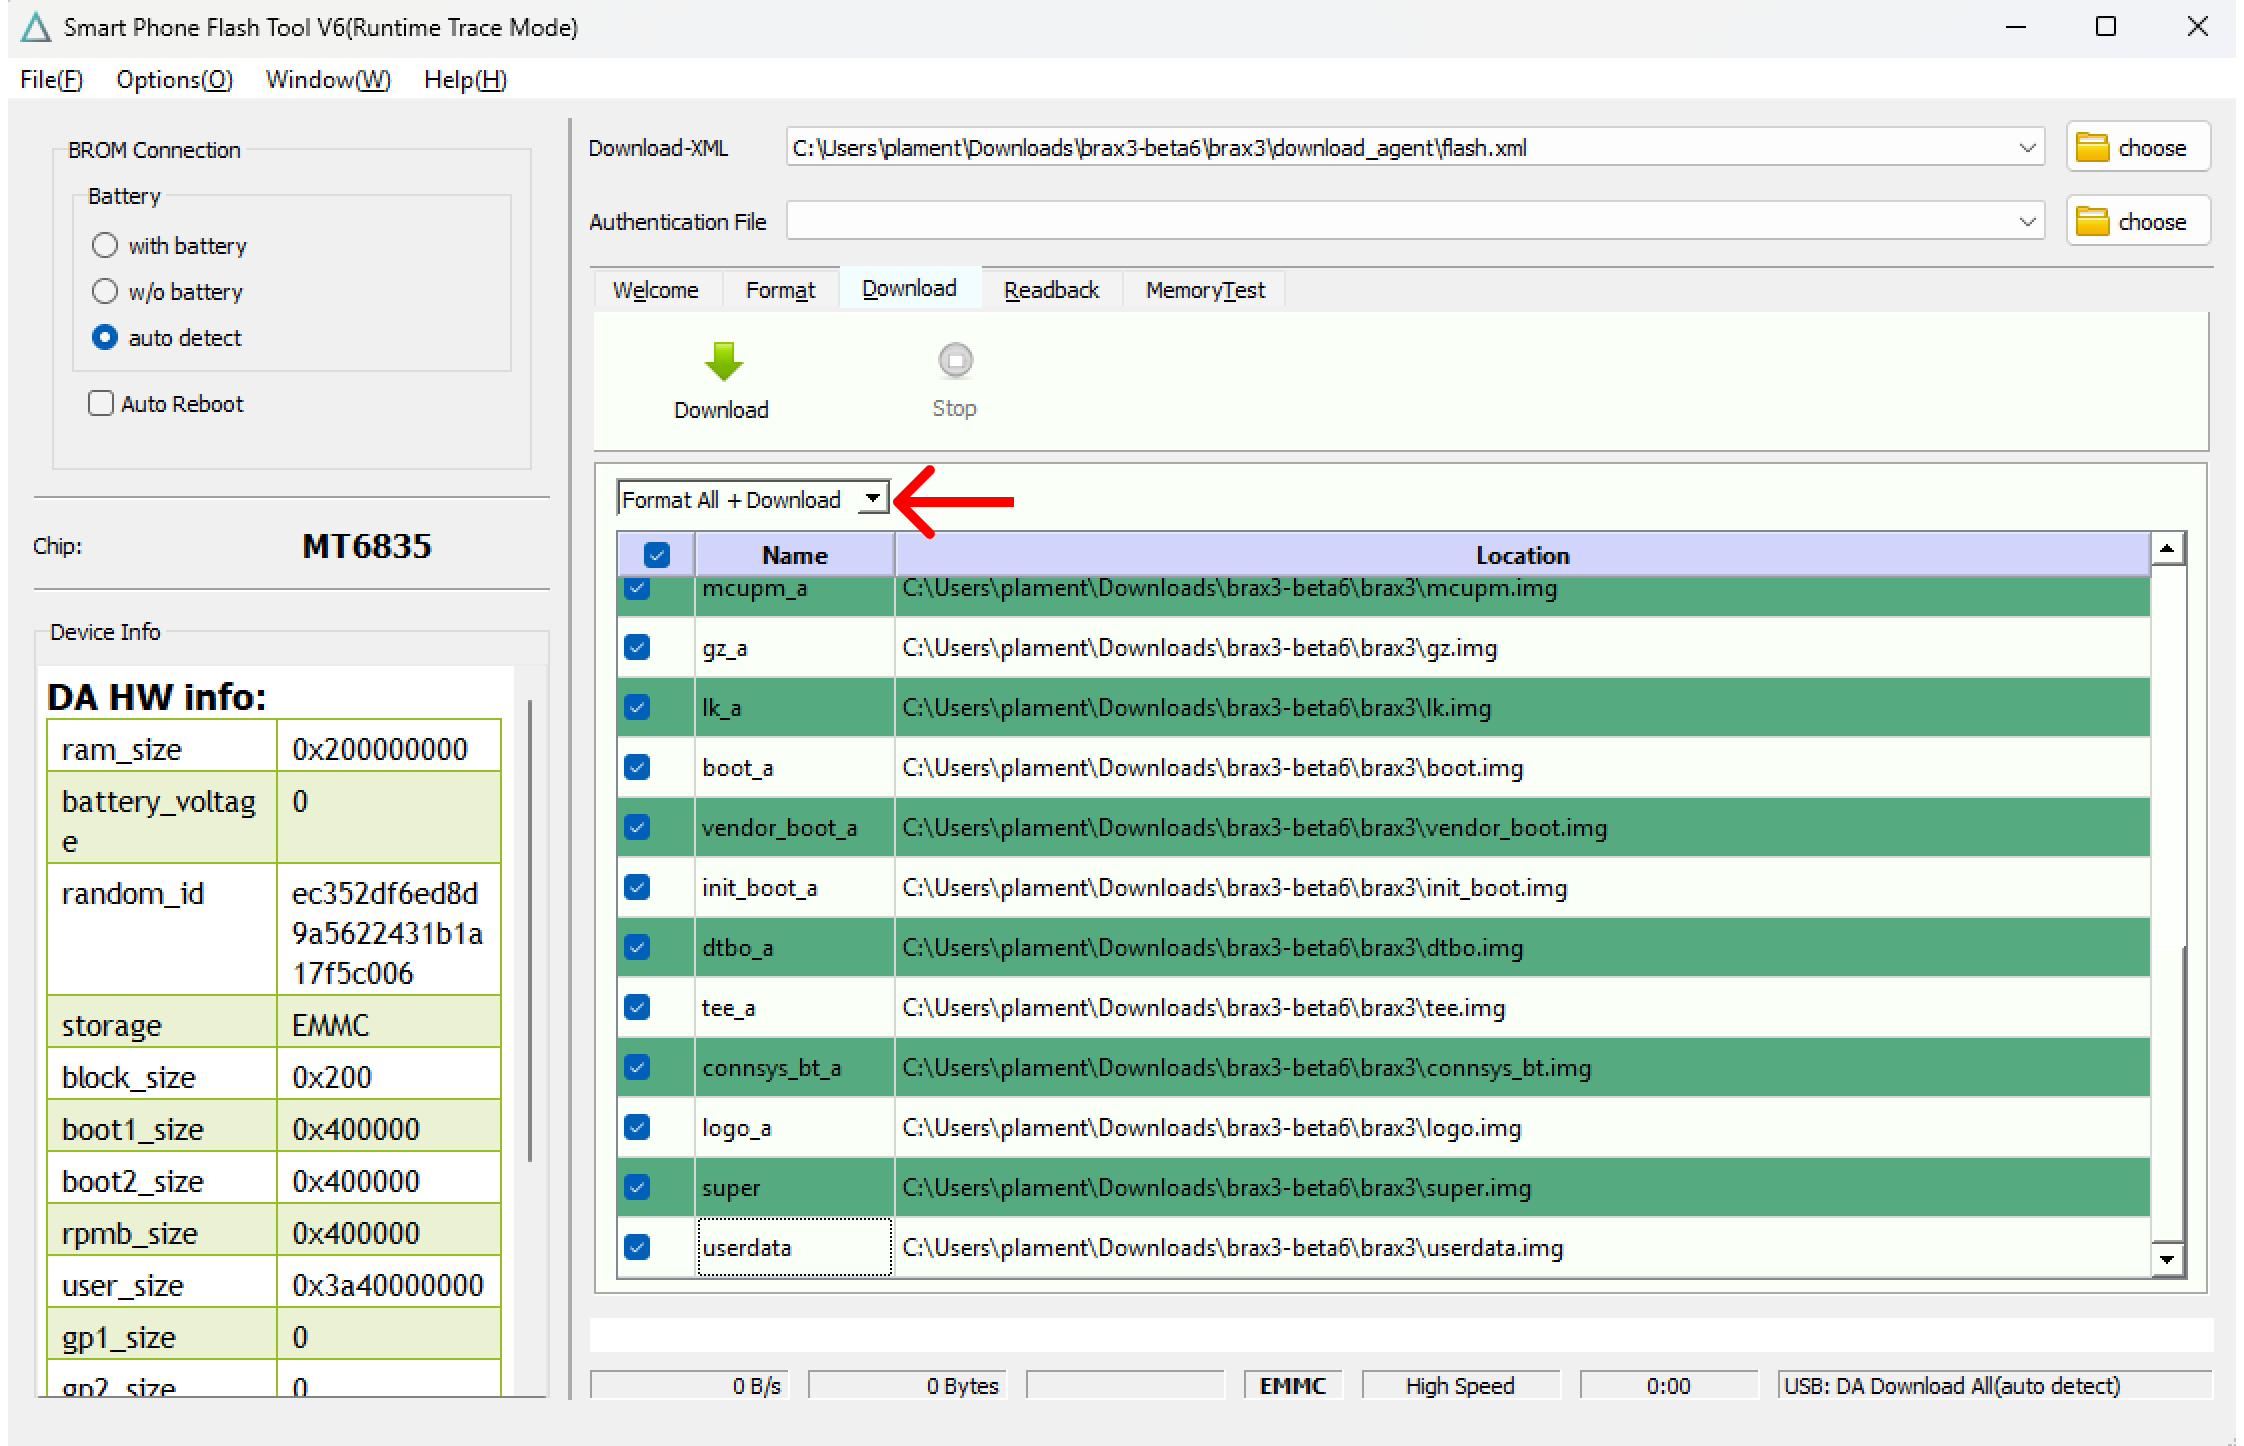
- Next step provides several options, which will determine whether your user data will get deleted or not.
Option 1: Select Download only and deselect user data. By choosing this option, you will keep the userdata already stored on the device. Please note that some OS versions do not allow the Download only option, as they require a firmware update, which will lead to erasing user data. If a firmware upgrade is required, select Firmware upgrade from the dropdown and press Download. Once ready, you can then select Download from the dropdown and continue with the next steps.
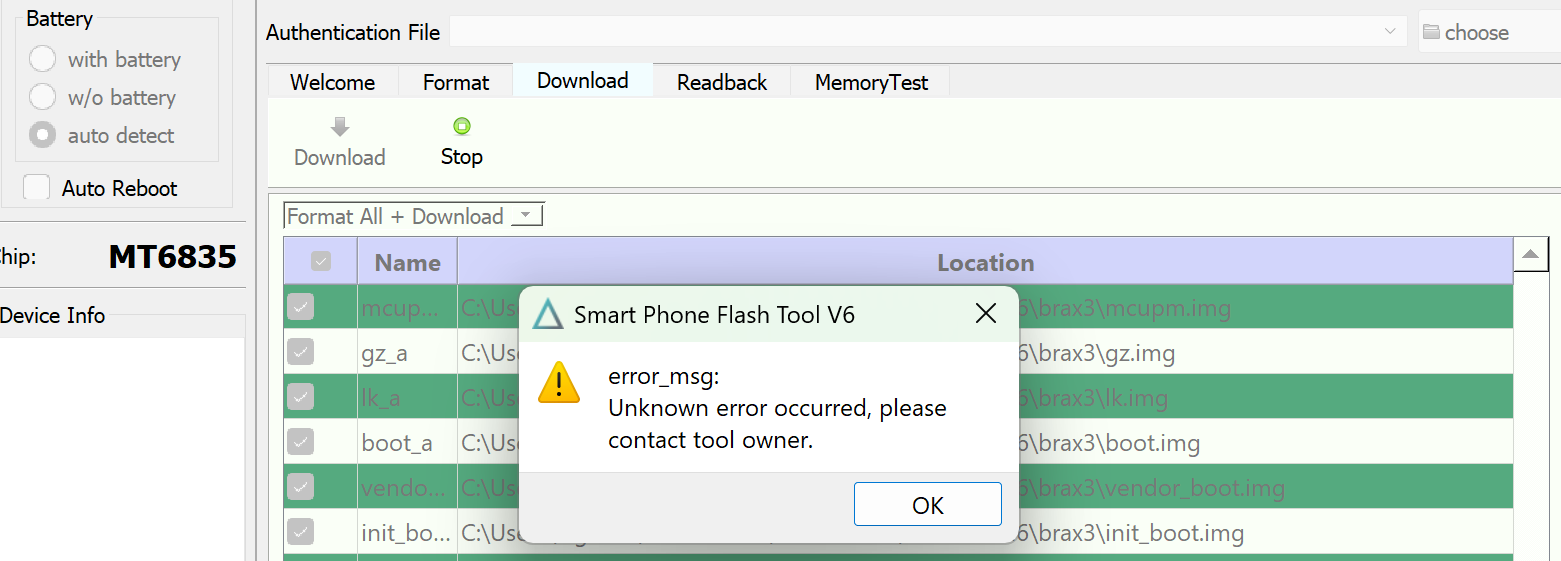
Option 2: Select Format All + Download. By choosing this option, you will reformat the device while installing the latest version. Note that deselecting userdata will not be an option when Format All + Download is selected, meaning you will be deleting your user data. Note that if you select Format All + Download, you will also wipe the device’s IMEI and serial number. Make sure you take a note of those before you start the installation process, as you may need to insert them later on in order to receive mobile connectivity from your telco operator.
-
Press download.
-
Turn your BraX3 device off.
-
Plug in your BraX3 device via USB cable. Once plugged, the process of flashing the OS will start. The process usually takes 2-3 minutes. When completed, you will see an indication that the process has finished successfully.
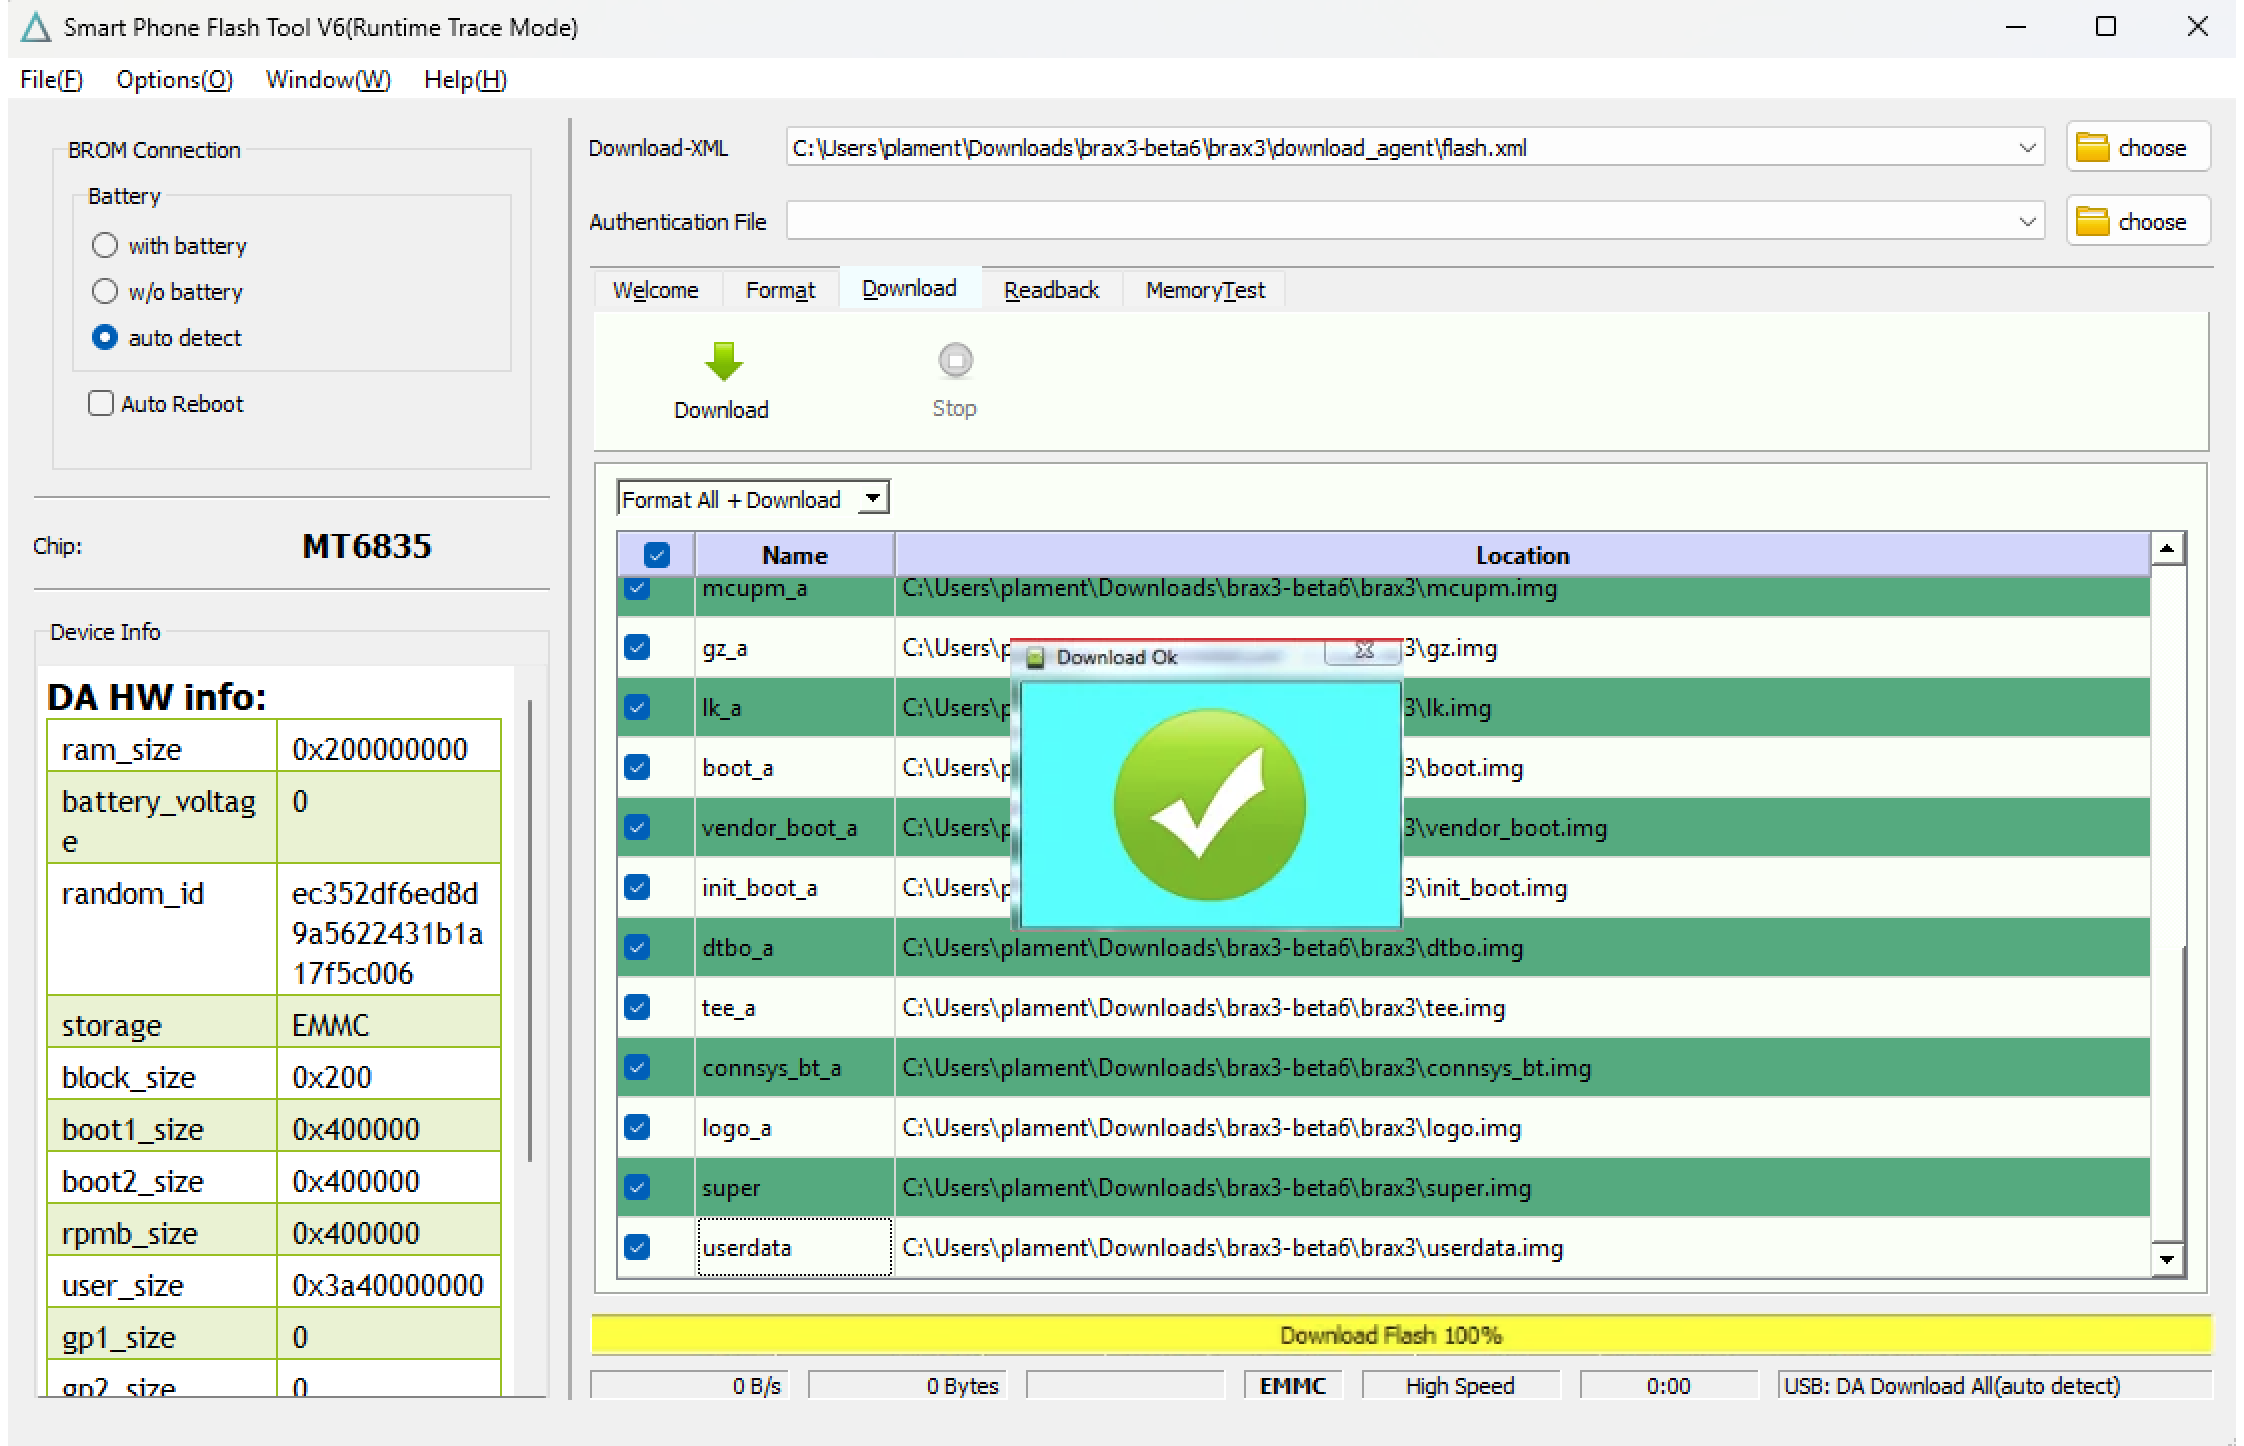
![]() Congratulations – Your OS is now installed/updated!
Congratulations – Your OS is now installed/updated!
You can now reboot your phone and enjoy the version you’ve installed.
Install via fastboot
Before you start, you need to ensure the following:
- Your BraX3 has an unlocked bootloader (see how to unlock your BraX3 bootloader)
- Android Platform Tools downloaded and extracted to your Desktop folder.
So let’s dive into the steps:
- Download the latest OS installation package
- Unarchive the installation package file
- Copy all the Disc Image Files and
.binfile from the installation package folder (see step 2) and paste them in the platform-tools folder (where your Android Platform Tools have been saved). - Copy the
flash.shfile and paste it in the platform-tools folder (where your Android Platform Tools have been saved).
Tip: In case you’re updating your OS and don’t want to wipe your user data, remove the command
fastboot format userdatafrom yourflash.batorflash.shfile. That way your user data, including your installed apps, files, images, etc. will be preserved.
- Connect your BraX3 to your PC by using a reliable USB data cable.
- Pres Allow when you’re prompted to Allow USB debugging.
- Open the Command Prompt (press
Win + R, typecmd, and hit Enter) for Windows or Open your Terminal for Linux. - Navigate to the Platform Tools folder using the following commands:
For Windows:
cd C:\Users\[Your Username]\Desktop\platform-tools-latest-windows\platform-tools

For Linux:
cd ~\Desktop\platform-tools_r34.0.4-windows\platform-tools
- Type
adb devicesand press enter.

- Type
adb reboot bootloaderand press enter. The phone will now reboot into fastboot mode (when you’re in fastboot, you will see the “Brax” logo and a text “FASTBOOT MODE” at the bottom left of your screen. - On your PC, open your platform-tools folder and double click the
flash.batfile (for windows) orflash.shfile (for linux) - The installation of the OS will now commence. You will see the installation progress on your terminal. Once completed, unplug your device from the USB and hold the power button.
![]() Congratulations – Your OS is now installed/updated!
Congratulations – Your OS is now installed/updated!
Common Issues When Installing the OS via Fastboot (and How to Fix Them)
If you’re running into problems while installing the OS on your BraX3, you’re not alone. Here are the most common issues users encounter — and how to solve them quickly.
- Device Not Detected by ADB or Fastboot
Problem:
Running adb devices or fastboot devices returns nothing, or just says “unauthorized”.
Fix:
- Make sure USB debugging is enabled on your BraX3.
- Tap Allow when prompted with “Allow USB debugging”.
- Reconnect the USB cable and try a different port (preferably USB 2.0).
- Use a data-capable cable, not just a charging cable.
- Try restarting both your phone and PC.
- Reinstall or update the MediaTek USB drivers.
- “Command not found” or Unrecognized Command in Command Prompt
Problem:
Commands like adb or fastboot aren’t recognized in Command Prompt.
Fix:
- Make sure you’re in the correct folder: the one that contains
adb.exeandfastboot.exe. - Use the
cdcommand exactly as shown in the guide, and verify the path. - Alternatively, drag the platform-tools folder into your Command Prompt window to autofill the path.
- Use
.\adbor.\fastbootif Windows doesn’t recognize the command alone.
- Nothing Happens When Running
flash.bat(Windows only)
Problem:
You double-click the flash.bat file but the installer doesn’t run or closes immediately.
Fix:
- Double-check that you followed step 4 correctly:
- Removed the
#!/bin/bashline and other comments starting with#. - Saved the file as
flash.bat, notflash.shorflash.bat.txt.
- Removed the
- Right-click the file and select “Run as Administrator”.
- Ensure all the Disc Image Files were correctly copied into the platform-tools folder.
- Installation Fails or Freezes Midway
Problem:
The flashing process starts but fails midway, or appears to freeze with no progress.
Fix:
- Confirm that all required files were copied into the platform-tools folder (not just
flash.bat). - Try using a different USB cable and/or port.
- Do not use USB hubs or adapters; plug directly into your computer.
- Restart the process and make sure the device is in Fastboot mode (you should see “FASTBOOT MODE” at the bottom left).
- Device Boots to Old OS After Flashing
Problem:
After the flash completes, the device boots into the old operating system or doesn’t reflect changes.
Fix:
- Make sure the flashing process actually completed without errors.
- Try manually rebooting into recovery and wiping cache/factory resetting.
- If in doubt, re-run the process from the beginning and double-check that you are using the latest OS package.
- Stuck in Fastboot Mode After Flashing
Problem:
Your BraX3 doesn’t boot into the system and stays on the Fastboot screen.
Fix:
- After the flashing completes, disconnect USB and hold the power button for 10–15 seconds until it reboots.